 Camera manufacturers have been claiming for years that their digital sensors have the same dynamic range as film… and yet at the same time there has been a steady growth of “HDR” and tone mapping utilities. This article describes the technique I currently use to create the source images for my panoramas.
Spherical panoramas present two key challlenges to the photographer:
- Photographing “everything” visible form one point usually means trying to capture a much greater range of brightnesses than a single photograph
- Combining multiple images shot over a period of time can be problematic when things move.
The challenge, then, is to capture the widest possible dynamic range with the smallest number of images. The smallest number of images is obviously 1.
As an added challenge, I also try to retain the relationship between different scene brightnesses. I’m not a big fan of artifically darkened skies or excessive unsharp masking like most of the images in the “HDR” group on Flickr.
Tweaking RAW conversions
There are some simple methods for tweaking a RAW image when it’s converted but many of them have statistical component that will vary with the histogram of the images. For the purposes of stitching images, all processing steps must be identical for each images so these are out.
HDR merging multiple conversions with different exposures
One perfectly acceptable method is to convert each RAW file with multiple exposures and then merge them to a HDR image before, during or after stitching. Either way, this is creates a lot more images and extra work, which I’d prefer to leave to situations where the source images are actually shot at different exposures. I only want one source file from each RAW image, and I want it quickly 😉
Direct blending via Photoshop
The method I use is relatively simple, involving nothing more than creating a stack of images of multiple exposures and then adjusting the transparency of each layer, and then flattening this to a single 16-bit image in preparation for sitching. Below are the steps in my Photoshop action:
- Open RAW file in Adobe Camera Raw
- setting exposure to -2ev
- recovery, fill light and blacks set to 0.
- load camera profile and any other lens corrections you have
- Repeat until exposure is +2ev
- Open RAW file in Adobe Camera Raw
- increase exposure 1ev
- Select All
- Copy
- Close
- Paste
- Open RAW file in Adobe Camera Raw
At this point you have a stack of 5 images from +2ev (top) to -2ev (bottom). Now it’s just a case of setting the opacity for each layer. The values I’ve used are listed below with the sample images. Then flatten and save and your done.
The table below shows the images used in each layer and the opacity for the layer in the final result. There is plenty of room for experimenting with different combinations of layer opacity, so you don’t have to use these specific values.
| Image | Exposure adjustment | Layer opacity |
|---|---|---|
 |
+2ev | 10% |
 |
+1ev | 10% |
 |
0ev | 30% |
 |
-1ev | 30% |
 |
-2ev | 100% |
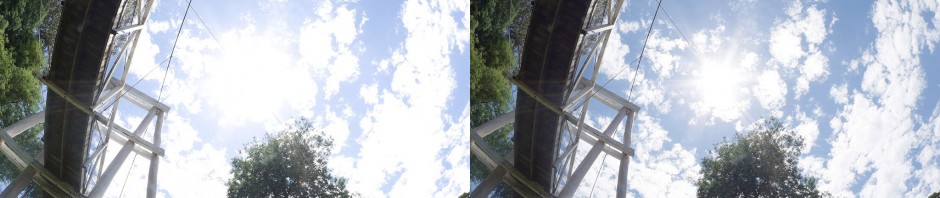
In this example I’ve used a slightly over-exposed image (complete with dust and flare), and whilst some of the highlight detail has inevitably been lost it does demonstrate the gain in detail without having to resort to unsharp masking.
 The main benefits from this method are at the highlight end as you can see from the recovered detail in the clouds above. This proivdes some additional leeway for increasing exposures, and rely less on recovering shadow detail from slightly under-exposed images.
For the actual panorama (shown below) I used the set of images with 1ev less exposeure with a small amount of unsharp masking.
Yarra River, Warburton in Victoria
This approach will also work with “real” bracketed image sets. Movement between images in this situation can be a headache for a true HDR workflow, but in this case any differences between images will appear as a slight ghosting since only a small percentage of each image contributes to the final image.
To Do
There is usually a slight colour shift with this process. So far I’ve been manually tweaking images at the end of the process but I should get around to adding a calibration step.